.avif)
AWS WAF and CloudFront: How to Use Them Together


Security is really important. There is nothing like the gut-wrenching feeling of exposing users' data. However, security isn't the most exciting part of web development and is often ignored. Using AWS CloudFront and AWS WAF together, you can add some security to your sites with less work and focus on making features for your users.
In this post, I'll provide some information about AWS CloudFront, AWS WAF, and SQL injection. Then I'll provide a step-by-step guide on how to use the two AWS services together to protect against SQL injection.
Some Background Information on AWS WAF, CloudFront, and Injection
A Web Application Firewall (WAF) Checks If the Contents of a Message Can Be Trusted
You probably already know what a firewall is—you've likely seen a physical one. The most common that you'll come into contact with are network firewalls. These firewalls deny or allow access from a trusted source at the network layer, sometimes called Layer 3. However, a web application firewall (WAF) works in Layer 7, the application layer of networking. Closest to the user, this layer can check if the contents of a message can be trusted. AWS WAF is the web application firewall available from AWS.
The Best Way to Serve Your Content Fast Is a Content Delivery Network
There are many ways to build a website, but all ways have something in common—you need to store files and allow users to download them the quickest way possible. The best way to deliver content around the world with AWS is CloudFront. This service is a content delivery network, distributing your files to hundreds of data centers, which serve content to users directly. CloudFront provides a gateway to most AWS services and even arbitrary HTTP endpoints.
According to OWASP, Injection Is the Most Critical Security Risk to Web Applications
OWASP is a nonprofit foundation. It helps people like you and me understand and tackle complex security issues. OWASP periodically updates a list of the top 10 most critical security risks to web applications. Injection is normally in the top three—since 2017 it's number one.
Providing Protection for the GeoJS API Using AWS WAF
The rest of this post will provide instructions on how to configure AWS CloudFront with a WAF using an origin of the GeoJS API. This API provides geolocation lookup and is free to use, which makes it a great API to test against.
1) Create an AWS WAF to Guard Against Injection Attacks
First, log in to the AWS console and go to the AWS WAF homepage. The screenshot below shows the welcome page.

Press the orange Create web ACL button.
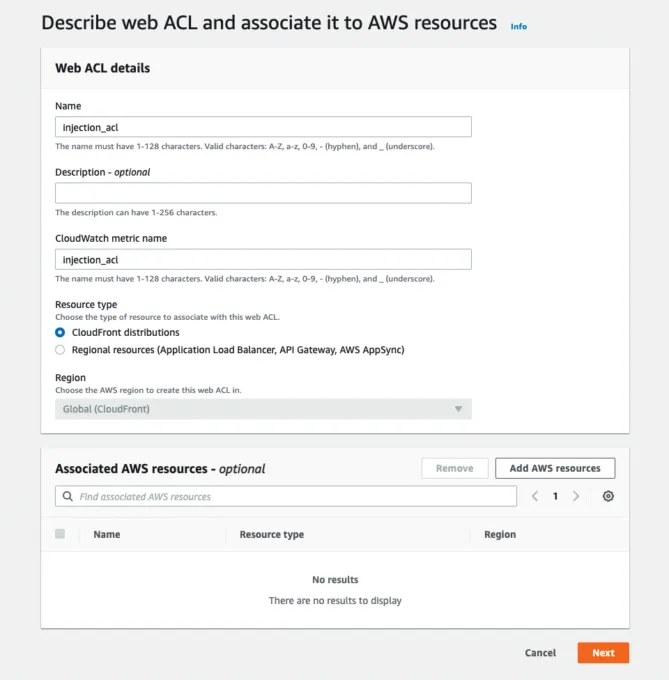
2) Give Your CloudFront WAF Web ACL a Name
Add the following to the Create web ACL (access control list) wizard:
- Name: injection_acl
- Resource type: CloudFront distributions
Press the orange Next button to go to the next page of the wizard. The screenshot below shows these values input into page one of the wizard.
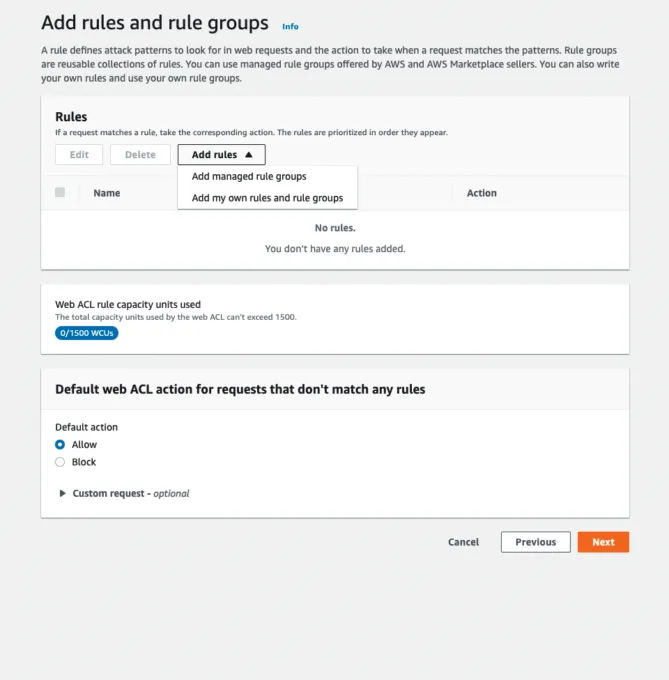
3) Add a Web ACL Rule to Block Injection Attacks
The second page of the wizard adds the protection against injection attacks. Click the Add rules dropdown and select Add managed rule groups. The screenshot below shows page two of the wizard with the option to add managed rule groups.
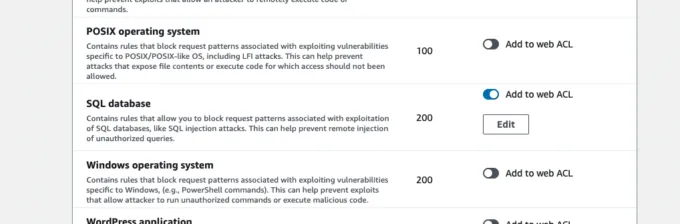
Open the AWS managed rule groups menu and scroll down to the SQL database option. Toggle Add to web ACL. Lastly, press the orange Add rules button. Using an AWS managed rule group means you're up to date with the latest SQL injection rules automatically. The below image shows the location of the SQL database rule group.
Press Next again to go to the third step in the wizard.
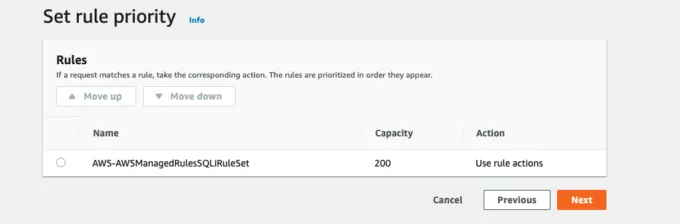
4) Rule Priority Is the Order That Rules Are Evaluated In
The third step in the wizard is rule priority. This is the order in which rules are evaluated. As there is only one rule, press the Next button. The screenshot below shows the Set rule priority step.
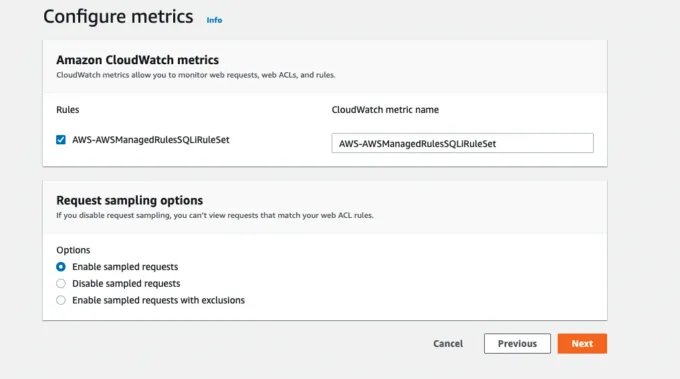
5) Metrics Allow You to Monitor Web Requests
The fourth step in the wizard is to configure metrics. Metrics allow you to monitor web requests, web ACLs, and rules. Leave the default selections and press the Next button. The following image shows the default options for the Configure metrics step.
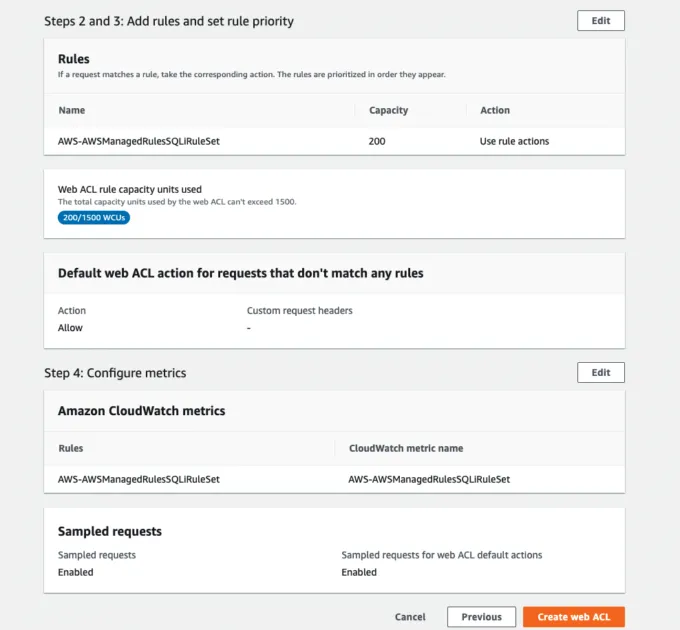
6) Review and Create a Web ACL
The final step is to review your web ACL. If you followed the above steps, you can press the Create web ACL button. The image below shows a section of the Review and create web ACL step.
You now have a web ACL. You can use this web ACL in the following section.
7) Create a CloudFront Distribution With GeoJS API as Origin
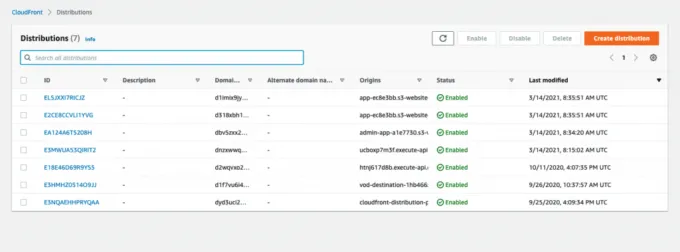
If you followed the previous section on creating an AWS WAF Web ACL, you're now ready to create an AWS CloudFront distribution with the GeoJS API as the origin. First, go to the CloudFront homepage. The below image shows the homepage with your current distributions. If you don't already have any distributions, you'll see a welcome screen.
Press the orange Create distribution button. This will redirect you to the creation wizard.
8) Create Distribution Wizard
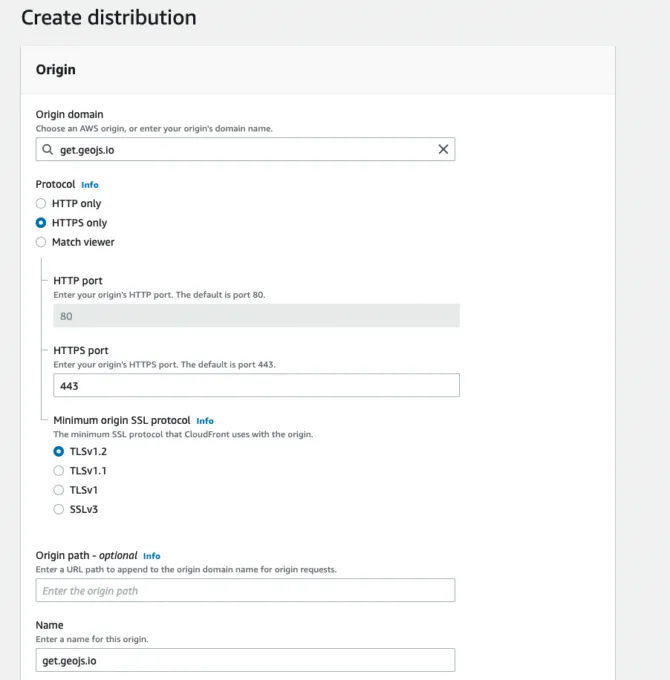
Next, enter the following into the Create distribution wizard page:
- Origin domain: get.geojs.io
- Protocol: HTTPS only
- Minimum origin SSL protocol: TLSv1.2
- AWS WAF web ACL: injection_acl (the Web ACL we created earlier in this post)
Press the orange Create distribution button.
The following image shows the first three inputs into the Create distribution wizard page. The dropdown to add the WAF is further down the page.
Congratulations! You now have a WAF protecting a CloudFront distribution.

9) Verify the CloudFront Distribution Works
The CloudFront homepage now contains the new distribution. Copy the Domain name for the distribution with the origin get.geojs.io. The image below shows the row in the table for my distribution. Your Domain name will be different.

To verify the CloudFront distribution works, add /v1/ip/country.json to the Domain name. For example, for my distribution, this would be https://de6odi519cua3.cloudfront.net/v1/ip/country.json. Pasting this URL into my browser gives the below output. You'll get different values in the response, but the format will be the same.

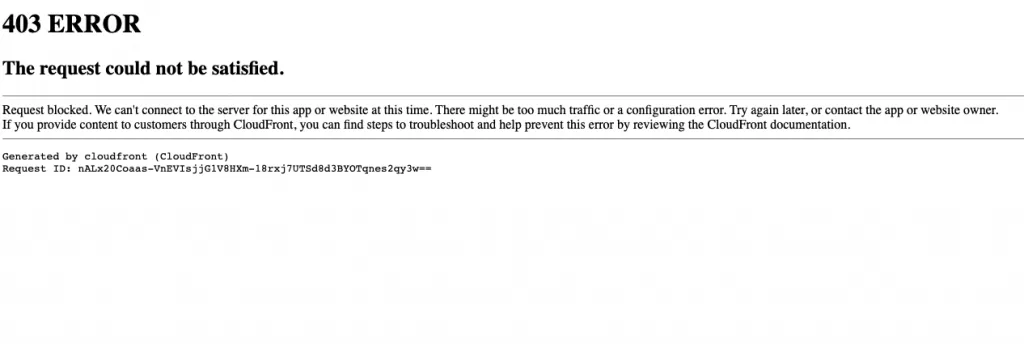
10) Check the WAF Rules Are Triggered When Simulating an Injection Attack
To check the WAF is working, simulate an SQL injection attack. The specific vulnerability chosen comes from example three of the SQL injection OWASP page.
If successful, this attack would allow you to run arbitrary database commands—which is really bad!
Add ?itemName=%22name%27);%20DELETE%20FROM%20items;%20--%22 to the base URL. In my example, that would be https://de6odi519cua3.cloudfront.net/v1/ip/country.json?itemName=%22name%27);%20DELETE%20FROM%20items;%20--%22.
The image below shows the error when your WAF blocks communication to your API.
Return to the AWS WAF console for CloudFront rules and select injection_acl. The image below shows that the URL with the attack was blocked because of the AWS managed rule AWS#AWSManagedRulesSQLiRuleSet#SQLi_QUERYARGUMENTS.
How to Use CloudFront and AWS WAF Together to Protect Against SQL Injection Attacks
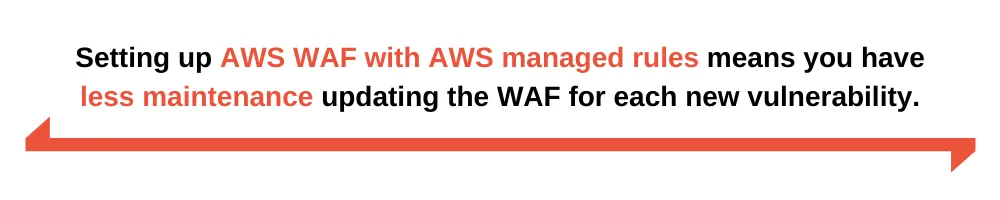
This post explains how to use CloudFront and AWS WAF together to protect against SQL injection attacks. Injection is the number one critical risk for web applications according to OWASP. Setting up AWS WAF with AWS managed rules means you have less maintenance updating the WAF for each new vulnerability. You connect to the AWS WAF in the CloudFront distribution wizard when creating a new distribution. After configuring both services, you can test the WAF will block incoming SQL injection attacks before they reach your application.
This guide only deals with one type of vulnerability, SQL injection. It's a good idea to guard against all the critical risks for web applications according to OWASP. This will depend on how your application is written. For example, if your app doesn't use an SQL database, then protecting against these attacks is pointless! Use your own judgment to decide which rules are best. In addition to the AWS managed rules, there are many third-party rule groups, and you can even make your own.
If this sounds complicated and like a lot of work—it is. To avoid having to set up and manage security for your web applications yourself, take a look at Traceable AI. Traceable AI not only automatically protects your web applications from the OWASP (web) top 10 attacks, but it also uses AI to protect your application’s APIs, all without you needing to be the expert.
This post was written by Peter Grainger. Peter is a senior engineer at Sage with over 10 years of experience in diverse industries such as satellite communications, public sector, and finance. He’s content to automate himself out of most jobs and is happiest deleting code rather than writing more. Peter has deep knowledge of Java, JavaScript, Node, MongoDB, and GitLab.
The Inside Trace
Subscribe for expert insights on application security.


